Repair Mr.Coffee (IDS77) Thermal Fuse
If you, however, have bought it and broke it in the first run then continue.
Mine simply stopped working right on the day I bought it, in fact this is the second Mr. Coffee grinder I bought that day. May be I was trying to grind too much, but as a consumer device I'd expect it to "auto shut off" if it's too hot, rather burn itself.
The good news is, it only burns a thermal fuse, which is fairly easy to replace if you get under the hood. Once you remove the grinder cup you can see the following,


Homemade Meditation Benches
 |  |
 |  |
If you like to make one at home too, here are the details.
- Materials
- Wood – 1 x 8 (i.e. 3/4” x 7+1/4”) pine boards http://www.menards.com/main/building-materials/lumber-boards/boards/select-boards/1-x-8-x-8-select-pine-board/p-1934090-c-13118.htm
- Hinges – 3” x 3” door hinges, 1/4” round corner http://www.menards.com/main/tools-hardware/builders-hardware/door-window/residential-hinges/3x3-door-hinge/p-1475757-c-9687.htm
- Used 1/2” #10 Phillips flat head screws http://www.menards.com/main/building-materials/drywall/screws/wood/10-x-1-2-phillips-flat-wood-100pcs-pkg/p-1638963-c-8940.htm
- Leg sliders – Slipstick 3/4” Slider Foot http://www.amazon.com/Slipstick-CB190-4-Inch-Slider-16-Pack/dp/B000G9WK44/ref=sr_1_2?ie=UTF8&id=1365832735&sr=8-2&keywords=slipstick+slider
- Felt pads (not shown in picture) - http://www.amazon.com/Waxman-Self-Stick-Round-Brown-8-Inch/dp/B000VYN7CS/ref=sr_1_4?s=hi&ie=UTF8&qid=1365832847&sr=1-4&keywords=felt+pads
- De-waxed Shellac – Bulls Eye Seal Coat http://www.menards.com/main/interior-wood-care/specialty-wood-finishes/bulls-eye-seal-coat-universal-sealer/p-1963335-c-13129.htm
- Steps
- Cutting wood – a hand saw is enough actually, but I used a jig saw to make it bit faster and to cut the semi circles on legs. Dimensions are given below
- Fixing hinges – I used a router to make the mortises so that legs would close flush with the main board.You could omit this if this is not a concern.
- NOTE. I have flipped one side of the hinge (by removing its pin) to get them fixed as shown above. The reason was that the hinges I used won’t close flushed. See diagrams below.
- I didn’t like the protruding wedge shape (right most image above), hence the flipping (see here to know how to remove hinge pin) and mortising.
- Now, with some custom mortise routing I could get the legs to close flushed (above right). I made few jigs to make it easy to batch these as below.
- Finishing – 120 grit sanding followed by de-waxed shellac with 220 sanding between coats.
 |  |
| For legs, cut from the dashed lines, which are 1/2” from each edge. The 5.25 and 6.75 are lengths along the outside edges though. Alternatively, you could determine the angle from these two values and then calculate the the lengths for the actual cut piece. | The jig I made to draw semi circles and flush legs to the size. About the semi circle, I just used one of my wife’s planting pots to draw it. So I didn’t measure its diameter. You can use whatever shape or size you like. |
 |  |
|

 |  |
 |  |
| Mortise on the main board (ignore the writing), it’s the same for legs except the groove for hinge pin is on the edge rather in the middle and only half of the groove is necessary. | Simple jig made from 1/2” MDF. The dimensions for the hole depends on the flush trim router bit you are going to use. I used a 1/2” bit that came with this mortise kit. Roughly mine had about 1/16” added to actual hinge dimensions |
 |  |
| I had to use this 1/8” hardboard mask over the jig to get the depth difference in the mortise for groove and the hinge plate. So the process was to route entire shape WITH mask and then route the groove only WITHOUT mask. A plunge-based router would have eliminated this need. | Cross section of the mortise |
Notes on Windows PowerShell
- Is bit slow and creepy ;) but better than command line
- Running as administrator helps you overcome many of the access denied situations
- PowerShell script files are simple text files with .ps1 extension
- To run a script file,
- Open a PowerShell instance (preferably as administrator)
- Type the path to .ps1 file and hit enter
- If you get an error due to execution-policy is restricted, try
set-executionpolicy remotesigned
- The above will ask for your permission. To avoid that and force use
set-executionpolicy remotesigned -force
- If you want this to be done across a Windows HPC cluster using clusrun command
$nodes="node1,node2,..,noden"
clusrun /nodes:$nodes powershell set-executionpolicy remotesigned -force
- To run a script file,
- To start a new process through a script - http://technet.microsoft.com/en-us/library/hh849848.aspx
start-process command "options and args"- If you want it to be on the same window and wait for it to complete use
start-process command "options and args" -NoNewWindow –Wait
- If you want it to be on the same window and wait for it to complete use
- Invoke a command on a remote machine - http://technet.microsoft.com/en-us/library/hh849719.aspx
Invoke-Command -ComputerName $node -ScriptBlock {Start-Service MyService}
Handling variables
- Local variables
$x=10
$path="C:\users\dd"
$param0=$args[0]
$param1=$args[1]
$javaBin=$env:JAVA_HOME + "\bin"
- A better alternative – number 2 indicates system variable. Use number 1 for user variable
$javaHome=[Environment]::GetEnvironmentVariable("JAVA_HOME",2)
[Environment]::SetEnvironmentVariable("Path","$tmp",2)
- String operations (few)
- Concatenation
$name="John"
$x="hello " + $name + "! How are you ?"
$name.Substring(1) // "ohn"
$name.Substring(1,2) // "oh"
$name.StartsWith("hello") // true
$name.IndexOf("ohn") // 1
$name.Length // 4
$javaHome=$env:JAVA_HOME // e.g. "C:\Program Files\Java\jdk1.7.0_10"
$javaBinString=join-path -path $javaHome "bin" // e.g. "C:\Program Files\Java\jdk1.7.0_10\bin"
- For loop
for($i=1;$i -le 10; $i++) {
  //body
}
- -le is <=
- -lt is <
- -gt is >
- -eq is == in usual programming language notation
- Foreach loop
$jars=ls ($env:TWISTER_HOME + "\lib") *.jar
foreach ($jar in $jars) {
 $jar=$jar.DirectoryName + "\" +  $jar.Name
 $cp=$jar+";"+$cp
}
$([System.Runtime.InteropServices.RuntimeEnvironment]::GetRuntimeDirectory())This is pretty much I found useful for my work. Feel free to suggest any.
Study of Biological Sequence Structure: Clustering and Visualization
http://salsahpc.blogspot.com/2013/02/study-of-biological-sequence-structure.html
K-Means Clustering with Chapel
- Declaration of points, dimension of a point, iterations, and number of clusters. Note. These are configurable at start time by passing them as command line arguments. For example passing --numPoints 50000 will set the number of points to 50000 instead of 2000.
     config var numDim: int = 2,
                numClusters: int = 4,
                numPoints: int  = 2000,
                numIter: int = 50,
                threshold: real = 0.0001;
- Definitions of domains. The {0 .. #N} notation indicates the integer range starting at zero and counting up to N number of values, i.e. 0, 1, 2 ... N-1
     const PointsSpace = {0..#numPoints,0..#numDim};
     const ClusterSpace = {0..#numClusters,0..#numDim};
     const ClusterNumSpace = {0..#numClusters};
- Block distribute points along zeroth dimension across locales. The array Locales and the numLocales are made available to programs by the Chapel runtime and we have reshaped the locales into a two dimensional array of numLocales x 1 size. This ensures components of each point stay in the same locale when blocked.
     var blockedLocaleView = {0..#numLocales,1..1};
     var blockedLocales: [blockedLocaleView] locale = reshape(Locales, blockedLocaleView);
     const BlockedPointsSpace = PointsSpace
       dmapped  Block(boundingBox=PointsSpace, targetLocales=blockedLocales);
     var points: [BlockedPointsSpace] real;
- Arrays to hold current centers. Chapel’s rich domain operations make it possible to assign a subset of points as current centers by specifying a range as shown in second line.
     var currCenters: [ClusterSpace] real;
     currCenters = points[ClusterSpace];
- Replicated arrays to keep local centers and updates. Chapel allows transparent access to array elements on remote locales; however, performance may suffer when data is transferred over network. Therefore, it is beneficial to use local arrays when operating on points in a particular locale. Chapel provides a convenient distribution to achieve this, ReplicatedDist, which creates a copy of the array in each locale. The array reference resolves to the local copy in the particular locale where the referring code runs. Also note the use of atomic real and integer variables, which is done as a workaround to non-implemented atomic blocks.
     const ReplClusterSpace = ClusterSpace dmapped ReplicatedDist();
     var localCurrCenters: [ReplClusterSpace] real;
     // using atomic primitives as a work around to not implemented atomic blocks
     var localCenterUpdates: [ReplClusterSpace] atomic real;
     const ReplClusterNumSpace = ClusterNumSpace dmapped ReplicatedDist();
     var localCenterPCounts: [ReplClusterNumSpace] atomic int;
- The next steps happen iteratively while refining centers.
- We start by resetting local arrays as follows. The first line copies the current centers to localCurrCenters array in each locale. The ReplicatedDist in Chapel guarantees the array assignment in the first line happens in each locale. The next two lines initialize the two local arrays, i.e. localCenterUpdates and localCenterPCounts, to zero. Again, the distribution guarantees the two forall loops happen for each local copy of the arrays. These three statements are run in parallel by wrapping inside a cobegin clause.
          cobegin {
            localCurrCenters = currCenters;
            forall lcu in localCenterUpdates do lcu.write(0.0);
            forall lcpc in localCenterPCounts do lcpc.write(0);
          }
- Next is to compare the distance for each point against all cluster centers and decide the cluster it belongs to. Note the shifting of locales using the on clause in line 2, which in turn guarantee the access of current centers, center updates, and center point counts arrays local to the particular locale. We have placed the atomic construct to show where the updates should be done atomically, but it is not implemented in Chapel yet. However, the use of atomic variables, overcomes this and guarantees proper atomic updates. Also note if the number of clusters was large, the for loop could be changed to the parallel forall version with slight modification to the code. Moreover, if parallel task creation was unnecessarily expensive one could easily change the code to use serial execution.
          forall p in {0..#numPoints} {
            on points[p,0] {
              var closestC: int = -1;
              var closestDist: real = MaxDist;
              for c in {0..#numClusters} { // possibility to parallelize
                var dist: atomic real;
                dist.write(0.0);
                forall d in {0..#numDim} {
                  var tmp = points[p,d] - localCurrCenters[c,d];
                  dist.add(tmp*tmp);
                }
                if (dist.read() < closestDist) {
                  closestDist = dist.read();
                  closestC = c;
                }
              }
              forall d in {0..#numDim} {
                atomic { // here's where we need atomic
                  localCenterUpdates[closestC,d].add(points[p,d]);
                }
              }
              localCenterPCounts[closestC].add(1);
            }
          }
- Then we collate centers in each locale. Note the use of nested forall and cobegin constrcuts. Also, the tmpLCU and tmpLCPC arrays are not distributed, yet Chapel gives seamless access to their elements even when the referring code runs on remote locales.
          var tmpLCU: [ClusterSpace] atomic real;
          forall tlcu in tmpLCU do tlcu.write(0.0);
          var tmpLCPC: [0..#numClusters] atomic int;
          forall tlcpc in tmpLCPC do tlcpc.write(0);

          forall loc in Locales {
            on loc do {
              cobegin {
                forall (i,j) in ClusterSpace {
                  tmpLCU[i,j].add(localCenterUpdates[i,j].read());
                }
                forall i in {0..#numClusters} {
                  tmpLCPC[i].add(localCenterPCounts[i].read());
                }
              }
            }
          }
- Finally, we test for convergence. If it has converged or the number of iterations has exceeded the given limit we will stop and will print results.
          var b: atomic bool;
          b.write(true);
          forall (i,j) in ClusterSpace {
            var center: real = tmpLCU[i,j].read()/tmpLCPC[i].read();
            if (abs(center - currCenters[i,j]) > threshold){
              b.write(false);
            }
            currCenters[i,j] = center;
          }
          converged = b.read();
P.S. I thought I should mention here that this code may not be the most optimal due to the fact that for each point it'll do a locale shift. Ideally, I'd like to implement this in a fashion as "for each locale do for each point", but this requires you knowing the points assigned to a particular locale. Currently, Chapel doesn't have a readily available method to retrieve this info. However, Chapel developers suggested some workaround to my mail on Identifying Local Indices of Distributed Arrays
Automate Phylogenetic Tree Coloring: Dendroscope
Hard Labor
Open tree file using Dendroscope –> select leaf nodes for a particular cluster –> click “Select –> Advanced Selection –> LSA Induced Network” –> Ctrl+J –> check “Label Color” and “Line Color” –> pick the desired color –> hit “close” –> click somewhere to unselect nodes/edgesRepeat this (except opening file) for each cluster.
Hard Labor with Pain Killer
You can avoid the step in bold above by having a text file with label names for the particular cluster. Then after opening the tree file you can hit Ctrl+f and specify your text file there (using the open folder icon in that). This will go through each line of the text file and select the labeled leaf nodes. This avoids having to click numerous times just to select :). Still you have to go through the pain of selecting the LSA sub tree and modifying colors.No Pain, YES! gain
The clean way is to automate this process and Dendroscope facilitates this through its command line. Here’s what you need to generate using a simple script written by you.open file=<path-to-your-tree-file>;select all;set edgewidth=2;set color=0 0 0;set labelcolor=0 0 0;deselect all;
find searchtext=abc;find searchtext=def
select LSA induced network;set color=r g b;set labelcolor=r g b;deselect all;
Some explanation please …
Line 1 will simply open your tree file and set all the edges to a width of 2 and everything to blackA good reference is available in Dendroscope’s manual at http://ab.inf.uni-tuebingen.de/data/software/dendroscope3/download/manual.pdf
For each label in a particular cluster you need to add find searchtext=<label>; as in Line 2 (remember to separate with semi-colon)
Line 3 will select the LSA sub tree for the labels in Line 2 and line and label color to whatever color specified by r g b values
You need to include corresponding Line 2 and 3 for each cluster.
Once you generate this file simply open Dendroscope and go to “Window –> Command Input”. In the pop-up command window type source file=<path-to-your-generated-file> and hit “Apply”. That’s it enjoy!!
How to Compute The Sum of Squares for First N Integers
| We need to find, | ||
![clip_image002[7]](https://blogger.googleusercontent.com/img/b/R29vZ2xl/AVvXsEiVoo1M9GBt4dilexDYljZ1qgK_BC4Hqe5T8a-bMgqLfOHgXhDsevwh27_ulTSsTl22qTOUlRLgoBEW7sUy8Ips-mqahagbEHAVRGqOsvl-YevVxT0tc3djxXBQrUsxOxP7R3RE/s1600-h/clip_image002%25255B7%25255D%25255B8%25255D.png "clip_image002[7]") |
answer
| ![clip_image002[47]](https://blogger.googleusercontent.com/img/b/R29vZ2xl/AVvXsEhovqag56KZbqcBSeuFV4EMbLPCcqYqD-33bvmtX_eVGHnDKcN6eHu43AWPyRLH1_hcfsb-Hzy6R6GYc0Vh8pHPDFY8_mrWWj4ux5rQ7UjS6-rRY6Nm_1v0gWNieLzwbaUt5m2l/s1600-h/clip_image002%25255B47%25255D%25255B3%25255D.png "clip_image002[47]") |
| How to get that? | ||
| Let’s consider the expansion of | ![clip_image002[9]](https://blogger.googleusercontent.com/img/b/R29vZ2xl/AVvXsEiglQFSxATY8Jnl3P2Xz6nBTtxsyv5kgaIoiGN1wW8Ct8mi78xcUKapa3PvQC-BpY_97l3Q5Id8n82mZFA_TbzUaTihsyl28100GfbJPMFfTCHSekBrl_cIt5BIvLxSs4r6FpQ5/s1600-h/clip_image002%25255B9%25255D%25255B3%25255D.png "clip_image002[9]") | |
![clip_image002[11]](https://blogger.googleusercontent.com/img/b/R29vZ2xl/AVvXsEgF8OQEurIYdDO6XD4Dcj54RSsPu2_tBYI2w-ZBoew3hiF6FXeoB2yvhYI3Zl93fyL74cFiAoHeR6M1uyFi26Qmq34BDQllOVi0MGsI-3Ks3-_4QT7J9vXpu_HN7JU5xBNrXWv6/s1600-h/clip_image002%25255B11%25255D%25255B3%25255D.png "clip_image002[11]") | ||
| Therefore, | ||
![clip_image002[13]](https://blogger.googleusercontent.com/img/b/R29vZ2xl/AVvXsEgsnp8A4x-_oCkTDcUcTC8Bsz5qvpKOF2-ScgGiu0ETLTXp2aqPgOM1UV-2-dRtHZ-paN9-Pp-EIOWpdJeGh3jwEArHVp6ltFWBZLYdQP0DC1BhqKIRwvmcW1kfa8J9f15yq9pQ/s1600-h/clip_image002%25255B13%25255D%25255B3%25255D.png "clip_image002[13]") | ||
| Now let’s substitute values for | ![clip_image002[15]](https://blogger.googleusercontent.com/img/b/R29vZ2xl/AVvXsEgFIbN8u67L4RVLHiy3X4m1Iim-u01dkS9dURU927AWKTWwglPLdo5khsEE4iPbQ9k3S585qKgqJz4eY2022-QgVhUMtkPcCkKKPUa9g89IBe5wnjAIuLmAhWoCYpQU3xNbGweF/s1600-h/clip_image002%25255B15%25255D%25255B3%25255D.png "clip_image002[15]") | |
![clip_image002[21]](https://blogger.googleusercontent.com/img/b/R29vZ2xl/AVvXsEhMYhL7GoHtsafyveRnR7sDhbtwvzKObjOEsN8BLjSm0HyF9Rr2XAjGkSpr14N6K9sTEF52klhyphenhyphenjUWgPKNf15viHcs1HnXFUBGY_Iv-wETYPzO2GKcDWVl5Ne45mh3AvlpNZ5uC/s1600-h/clip_image002%25255B21%25255D%25255B3%25255D.png "clip_image002[21]") |
when
| ![clip_image002[17]](https://blogger.googleusercontent.com/img/b/R29vZ2xl/AVvXsEgb01HQhD1oPoNRk4Z2WHTyNaR7JUXdQv3rW-cV0L0rw8Y-WaPQlUhbA_1Wr3S2xaoHBgHWkDOswCtQXwPIcglytoWaCyV__EsK-iDUFreExkujj9ABSpHoVQ4hI7RoIumiHCOt/s1600-h/clip_image002%25255B17%25255D%25255B3%25255D.png "clip_image002[17]") |
![clip_image002[23]](https://blogger.googleusercontent.com/img/b/R29vZ2xl/AVvXsEgAaOtZcsut2ukAerz7jMrzuzOrEVAOt8rE-Ca9voyxjj8NWkl5hyphenhyphen9PpX7CspdK2GtrsD_t5ZNjIaO2aKID5IvQHEgGdCkgq49cqhBLFXeifm3AGgajah48TpaIY5dYDuZy1cVH/s1600-h/clip_image002%25255B23%25255D%25255B3%25255D.png "clip_image002[23]") |
when
| ![clip_image002[25]](https://blogger.googleusercontent.com/img/b/R29vZ2xl/AVvXsEjX2ToGTkliRNp4e2n4xr-mtM4KBIfVVyFGgs2lEKLTYEvArMBdJiopXfoGCLRoi8dfMNSvL0pI0PIDpbZac9sz948vAzzD6cGwzcX8dRD9suWrZcU7BPomVUo2sNT3YVdvCE2Z/s1600-h/clip_image002%25255B25%25255D%25255B3%25255D.png "clip_image002[25]") |
| … | ||
![clip_image002[27]](https://blogger.googleusercontent.com/img/b/R29vZ2xl/AVvXsEgjx0Ts1q2VtQSYbpuPKPXpl6EF1XCrau5b3-Xn5-Xhyphenhyphenyc_alBaNjdRXDSsWy1Y-7bdFDgwRZcHdwGmsqzmKoAH6t-IyUFpHLyZqOFxURb6FpNsNwriSnZnVlkNa6mKVsq5_Xm8/s1600-h/clip_image002%25255B27%25255D%25255B3%25255D.png "clip_image002[27]") |
when
| ![clip_image002[29]](https://blogger.googleusercontent.com/img/b/R29vZ2xl/AVvXsEgElgGoJd-jTZn_kpq-I1uCyyaRjfUo4kLcLw37JDnBqGNSgAZ8Xt7MHrRl-Ikyhz0Padtso-G5FuNyrM_KIsFxAcU1S8z5Sr2SE6ujbKkK9gTZS8cljnfAm4sC8GW0axVaAAFS/s1600-h/clip_image002%25255B29%25255D%25255B3%25255D.png "clip_image002[29]") |
![clip_image002[31]](https://blogger.googleusercontent.com/img/b/R29vZ2xl/AVvXsEg3KlAjFcOVcbN7Ik7GtwjRDdENpM4xqDZrF07xf1OqDS_yKqot38DAKysU_4AQYKmj4MUQEfV7rqdVgbBHQSuOmduQ41OOv-QoujXLO_D18ZSJAdZtt3D2dalA5WkbptPZHZ_j/s1600-h/clip_image002%25255B31%25255D%25255B3%25255D.png "clip_image002[31]") |
when
| ![clip_image002[33]](https://blogger.googleusercontent.com/img/b/R29vZ2xl/AVvXsEjI2qU52gUZsD5pAm20JxdFc1GfCodpZHe0E7qZyBwkRrSshnepqMa2__vQn_HwntdBk67HP-XJckrC_D7N6R8SI-aVbJp-EUFwa5FYLp4jBW1yv9uN5zC4av9rXIcE4oi7V6eo/s1600-h/clip_image002%25255B33%25255D%25255B3%25255D.png "clip_image002[33]") |
| if you sum them from top to bottom | ||
![clip_image002[35]](https://blogger.googleusercontent.com/img/b/R29vZ2xl/AVvXsEiCyh5UOxkVEKrGhqohfPlg3PXFPy5YTYdr9BkCVu02ZIAD5_YdE7B77P2_hF3mkcGGVU_r0PY669plT9TFeRMMDoUKgZT7hyVwhugjLz6db4csDkc5O4VN6SZae1WRsT1ZKR5X/s1600-h/clip_image002%25255B35%25255D%25255B3%25255D.png "clip_image002[35]") | ||
| Taking the sum of arithmetic series, | ||
![clip_image002[37]](https://blogger.googleusercontent.com/img/b/R29vZ2xl/AVvXsEhtqyAIx5j_hOoTvF9ysD-959iXcJ8h8k7z3c11Ybe-EUzL1vJCRKeHBSG08pMyjZ-tqH8k6yUELGxrii2VMgvEdpAthCS6Vcnyz2P-KM6YCCTWSRF8oNoJMMfxApgHPikeIMpF/s1600-h/clip_image002%25255B37%25255D%25255B3%25255D.png "clip_image002[37]") | ||
| Therefore, | ||
![clip_image002[39]](https://blogger.googleusercontent.com/img/b/R29vZ2xl/AVvXsEj38PXyLzqxYo52hTjm7u10WhNKZFB3rQiQ3uSL-nuIB11B71wmjvCXdgSe4jcyCnSj89b39h7gQutPMmz7YIXw7SihM4JcbvWJF6c0dt9o6N6pz58ncoUxM_IbSkgMK6qW6O6t/s1600-h/clip_image002%25255B39%25255D%25255B3%25255D.png "clip_image002[39]") | ||
![clip_image002[43]](https://blogger.googleusercontent.com/img/b/R29vZ2xl/AVvXsEiVjax4_4FuUnrpkUEvIOkhX5rmXtbOOnLUM3QDW-LjWgGCpryaaxh8-qISqtk64Y2Z9-4oPyFyke-wxznoZnB-7Oj9xfH7aDjj0t304x2xIqZxS28Dh4wtC05PiHdJs1OoTB_N/s1600-h/clip_image002%25255B43%25255D%25255B3%25255D.png "clip_image002[43]") | ||
![clip_image002[45]](https://blogger.googleusercontent.com/img/b/R29vZ2xl/AVvXsEiQf1a_ijQMvxrNFAGrwx-4yvdk_T1Uhk-qAm5KCGzSB88n2aQMDMFEHDBAsYmrUR7fBrB9LLL_L53tcPls1WorfjsZl9y4vZdiZHcDruvPwvUUX8Mav0t6gtkGPY2KnZd0y_VX/s1600-h/clip_image002%25255B45%25255D%25255B3%25255D.png "clip_image002[45]") |
Another good resource http://www.trans4mind.com/personal_development/mathematics/series/sumNaturalSquares.htm
Drilling Straight with a Hand Drill
If you don’t have a drill guide like http://www.sears.com/shc/s/p_10153_12605_00967173000P?BV_UseBVCookie=Yes&vertical=TOOL&pid=00967173000 then drilling straight using a hand drill will be a pain and will often result angled holes.
Here’s a simple and elegant (though not precise) solution. You will need a square ruler like http://image.made-in-china.com/2f0j00tvREcekzhJbq/Angle-L-Square-Ruler.jpg. The trick is that all drills have visible center line. Use the square ruler to guide this in a straight line.

When you drill without a guide as shown above, the drill is free to move along both blue and red axes. You can restrict this by using it as shown below with the square ruler.

The square ruler has a flat edge, so when you keep it as above, it will stay perpendicular to the drilling surface. You can rotate the drill to have its center line and the square ruler to be in the same vertical plane as blue axis is. Then, with bit of patience, you can guide the drill while keeping the center line in the same plane. Still the drill is free to move in both directions, but you can use the ruler to guide it very well restricting any movement along red axis.
OK, what about movement along blue axis? This is where you need to have some practice. You can use your eyesight to keep the distance between drill bit and the vertical edge of the ruler constant while drilling to make sure you are not moving along blue axis.
As I said earlier, this is not perfect or highly precise, but when you don’t have any the fancy guiding tools, this works like a charm.
Image source for the drill, hand, and wooden piece http://en.wikipedia.org/wiki/File:Drill_scheme.svg
Weekend Carpentry: Monitor Stand
I’ve been wanting a monitor stand for sometime now as the Dell monitor that I am having doesn’t have an adjustable stand. Apparently, these stands cost around $30-40 and it didn’t seem worth the money.
So I ended up building one out of some old furniture parts I had. In the end it turned out to be better than I expected :). In fact comparable to what you can buy online http://www.amazon.com/OFC-Express-Monitor-Stand-Black/dp/B0020LB28Q/ref=sr_1_9?s=office-products&ie=UTF8&qid=1345923737&sr=1-9&keywords=monitor+stand.
Here are some photos.
 |  |
| Finished product | It has enough space underneath to store my files |
 |  |
| Top view | Bottom view |
 |  |
| Just before I cleaned up the place
| My old monitor stand; just a cardboard box from Amazon :) |
Lexus Aux/IPod Input: iSimple Gateway

I’ve been wanting to use an auxiliary input with our 2006 Lexus ES for sometime and found this very neat solution from iSimple http://isimplesolutions.com/product.aspx?zpid=416. After doing some research on other available products on the market I decided to go with this one as it can control an IPod (or any other I* music device) right from the car stereo controls.
Setting up is pretty easy and sound quality is very well indeed! Here are the things you will need and steps to follow.
Equipment
- A socket wrench and 10mm socket. It’s helpful if you have an extension as well.


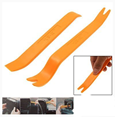
- [Optional] A plastic pry bar like the one on below (left). I simply used the one on right and trust me it’s very nice and does no harm to the leather.


Steps
- Shift gear to park position and push-on emergency brakes.
- Remove the plastic panel around the gear. Here’s a nice pictorial guide on doing this plus removing CD changer (http://www.clublexus.com/forums/es300-and-es330/505772-please-help-advice-i-need-to-replace-my-cup-holder.html)
- Then remove the AC control panel. This has no screws just pulling it out would do. If you need you could use the plastic pry bar.
- Next remove the four 10mm bolts and pull out the car stereo. Here’s a nice video guide for this and previous step (http://www.youtube.com/watch?v=w-0ESCWyz4w)
- To access the back of your stereo you may need to remove wires going for the clock and hazard light switch.
- From this point forward steps are straight forward to follow using the manual provided in the iSimple Gateway at http://www.pac-audio.com/PacProductData/PGHTY1/1_Instructions/pghty1_instructions_020910.pdf.
- A nice set of video demos are at http://www.pac-audio.com/videos.aspx
Tips
- You may need to think where to run your cables. I ran them to the center console box and with some effort managed to make nice installation without any drilling. Just post a comment if you need more information. I wish I took some pictures.
- I used Velcro tape to keep the device attached to the car behind AC control panel.


